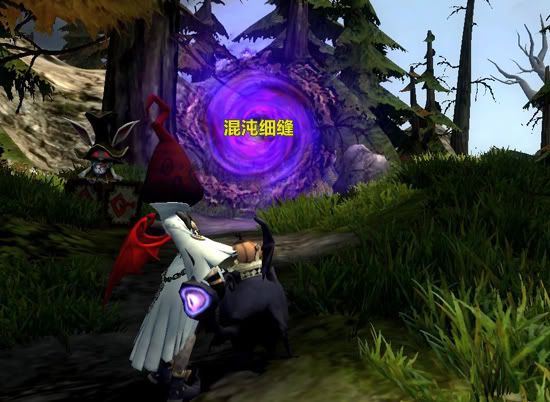
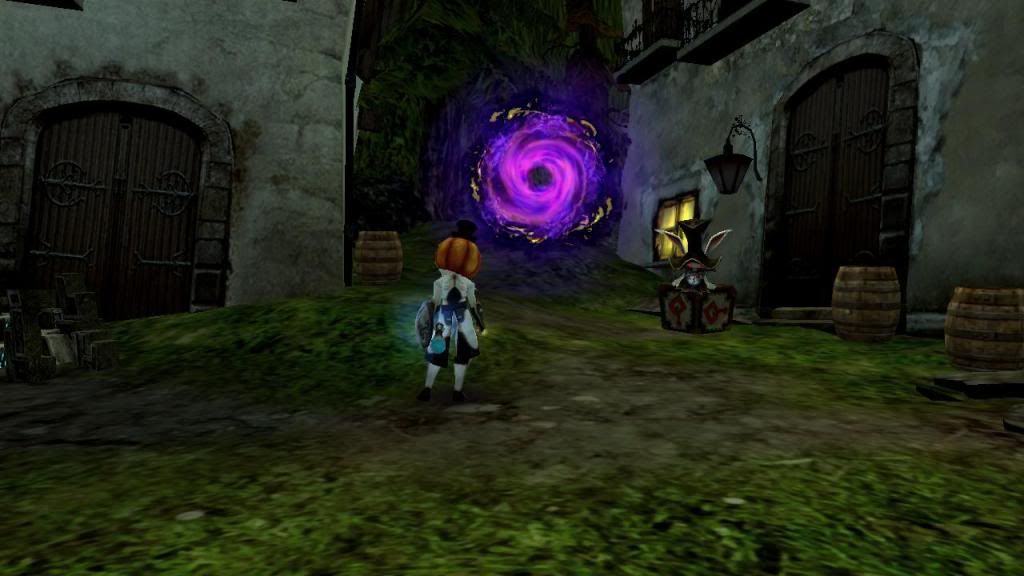
After you enter the Hermalte Port, walk straight past the Dissembler and keep a lookout on your right. There will be a portal before you reach the Forsaken Islet dungeon area.
Alternatively, you can enter through the Garden of Time and Space. Stage 1: Rotten Rock Demon
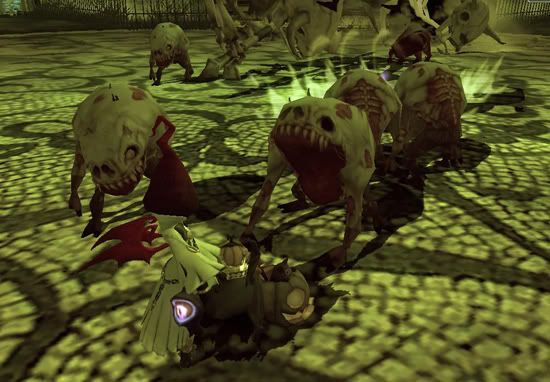
The 1st stage has a relatively small area, with various rock demons of various elements appearing. Eventually, the main green demon boss will spawn in the middle. This should be a relatively easy stage, but take note of these pointers:
1、You have to drag the mobs to the sides and kill them, if not they will be healed by the statue in the middle. The amount healed is quite huge, so the battle can be quite tough if you didn’t lure them away from the middle.
2、When the boss releases a green array on the ground, prepare to dodge away from the area. If not, the array will trap you at that position and be prepared to be hit by the surrounding mobs.
PS:Cleric’s shield block is useless here. With it active, you will still be trapped. And few hits from the mobs will remove your block in no time.
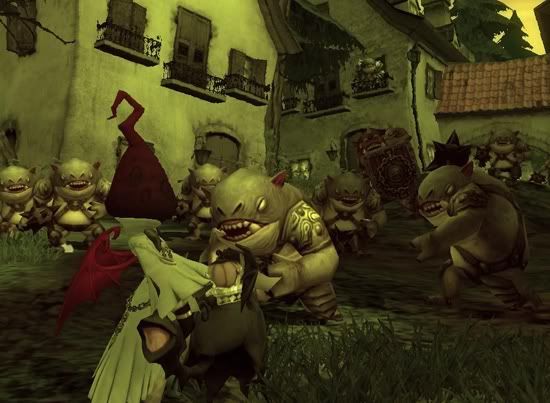
Stage 2: Minotaurs
This stage is relatively easy too. When you get in the arena, one of the gates will be opened while the minotaur inside will be charge out to attack. After a certain time, another gate will be opened and the next minotaur will be released. This will continue until all the minotaurs are out.
I would suggest to kill off the smaller minotaurs before heading for the main Boss, but if you can kill them fast enough, just kill whatever comes first. The only special thing to note:The minotaurs can use various skills to increase their defenses, for both physical and magic. These buffs can be removed by Merc’s silence, or be lightened by other armor reducing skills like Paladin’s Armor Break.
Stage 3:Medusa
Compared to the previous 2 stages, this stage can be considered as one of the harder ones.
The area is made up of 5 big squares, forming a “+” shape.
In the middle square area, you can see that there are 4 different coloured cubes stuck inside the ground, being Green, Red, White, and Yellow.
Whenever the Medusa boss raises her weapons, the screen will have a hint stating that the ground will be shifted within 5 seconds.
Then, one of the cubes will start hovering in the air.
The square area that is the closest to that hovering cube, will be the “Safe Area”. Even though you will still be damaged by the Medusa’s blade attack, this “Safe Area” regenerates your HP for 2-3 times. Your HP recovered will definitely exceed the damage done by the boss, so no worries.
As for the other 3 areas, you will be attacked by the blade attack without any regenerating heals. Paladins and SMs can use their various block skills to defend this blade attack, so they won’t need to dash to the “Safe Area”.
Be careful of this global blade attack. For female classes without good defense equipment, be prepared to die instantly if you don’t get to the “Safe Area”.
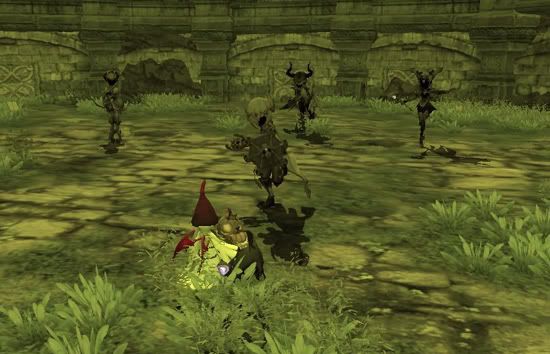
Stage 4:Stone Boss
This stage consists of a huge Stone Boss, accompanied by various small stone demons.
These stone demons will not attack, neither can they be damaged if the 2 dark crystals beside each of them are not destroyed yet. Similarly, if these small stone demons are not killed, the Stone Boss will have a blue protective aura that makes it invulnerable.
So, just kill the small stone demons asap then approach the main Stone Boss.
From time to time, the main Boss will resummon the small stone demons. At this point of time, the dark crystals won’t be recreated. Simply kill the smaller stone demons and head for the boss again.
Everytime the boss resummons the smaller stone demons, various food will be created at the area of spawn. These regeneration/buff potions include HP, MP, Damage, and even rotten potions (potions that reduces your HP/MP/stats) too!
When you’re eating the food, be careful that the food is actually the fresh one and not the rotten one. Also, the boss will throw stones from time to time, and has a long range rolling attack which can be quite fast.
Final Stage:The Dark Manticore
Do you still miss the Manticore Boss from the Prayer’s Resting Place? Now it has evolved to a black demon with various strong attacks. However, it can be an easy boss to deal with.
During the early stage, the Manticore will only use several basic attacks. Only after being reduced by 1-2 HP bars, then it will start casting various power moves. When it reaches the 2nd last HP bar, its frequency of attack will increase too. These are the basic attacks of the Manticore
Back Tail Sweep, Claw Swipe, Diving Attack after flying up the sky, Front Pounce, Tornado, Energy Ball, Black Hole, Gravity Field, Power Stomp. (These should be all) Back Tail Sweep: The boss will simply sweep his tail and to hit any enemies at his back. Don’t ever stay at the back of the Manticore. This attack can be quite painful. Claw Swipe: Similar to the claw swipe from Cerberus, however the frequency of attack won’t be as high as Cerberus. Just time your blink/tumble well and you should be fine. Energy Ball: The boss will just throw a huge black ball in front of him. As long as you stay close to the boss, you won’t be hit. Diving Attack: The boss will fly up the sky. When the boss HP is still high, after flying up the sky, it will start flapping its wings 3 times. After the 3rd flap, prepare to jump to avoid the ground attack. However, that’s not all. Several spikes will be created around the boss, so remember to use your tumble/blink to evade. You can jump to evade too. If you’re lucky, these spikes won’t hit you.
Alternatively, you can drive up your PC volume during the gameplay. When it is about to dive down, there will be a significant sound.
When the boss HP reaches 3 bars and below (to be confirmed), it will not dive down from the sky immediately after its flight. It will cast various Energy Balls to hit the ground. So please don’t blindly follow your team mates as you may die instantly from the attacks. Just move away from the balls. After this onslaught, it will flap its wings 3 times again before coming down.
When the Manticore has only 1 HP bar left, there will be some purple arrays shown on the ground before the Manticore decides to dive down, in which several flame demons will spawn and fly in some random direction. Just be careful not to get hit by them. Front Pounce: When the boss has locked on to one of the players, and that player is far from it, it will do a pounce like what you see in Cerberus Nest. Just blink/slide/tumble or move away. Power Stomp: The boss will raise both of its claw high while emitting a bright glow out from the claws. It will cause an earthshake while generating 4 blade waves spreading out of him. Just jump right before it stomps the ground, followed by a tumble/slide/blink. Black Hole:The boss will raise one of its paws at this point of time. It will emit a slight red aura while creating a black array in front of it. Just continue moving away from that array and you should be fine. ELs can use Flame Road, Warriors can dash, others can simply unstance and walk.
The damage of this skill may be quite low, but clerics have to take note. The numerous small hits will remove your Block buff in no time. Tornado:Several large tornadoes will be created in front of the Boss after it raise both of its paws. This time, there won’t be a glow emitting out from it. Subsequently, the tornadoes will fly outwards. It should be relatively easy to dodge. Just move away from them. The damage can be quite high. Gravity Field:Incredible damage with superb AOE. Without a decent HP, you can die instantly from it. The boss will create 3 black arrays around him, but there will be safe areas in between these arrays. Just get to the safe areas and continue attacking.
**Take note that staying near the boss at all times is the best way to be safe.
I am sure many of you know about this already but I still see many people using the old method to go to Nest entrances. I am not saying that it is wrong to do so. But the new method is better because
The walking distance is shorter.
The party can still enter another nest if you guys decide to clear another Nest.
Easier to find parties for different Nests because all Nest entrances can be reached from the same place. (You will notice the difference when the lv 40 Nests are out. Manticore Nest’s entrance is on the South exit of Saint Haven.)
You may argue that you can just simply press “O” and see the available parties for the Nest that you wish to go. Yes, I agree with you. I already mentioned that there is no right or wrong method. Just personal preference in whichever method you want to use. It can be easier for people to invite others to their party when they want to inspect equipments before inviting.
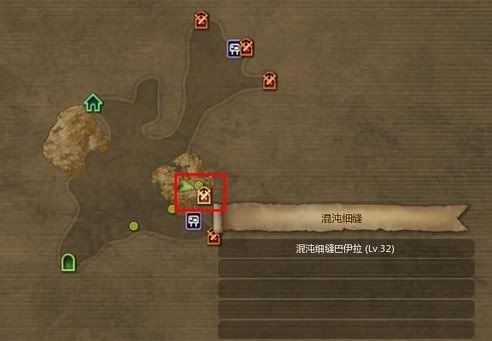
Now let’s take a look where is this new “place”. Introducing the Garden of Time and Space…
You can reach this location from the location circled in red in the mini map.
Upon entering, on your left hand side, you will see 2 entrances.
The first entrance of the left will be for Lv32 – Lv40 Nest [Normal] and the second entrance of the right will be for Lv32 – Lv40 Nest [Hell]. So Cerberus, Manticore and Apocalypse Nests can be found in these 2 entrances.
Minotaur Nest can also be entered here too. Credits to Eleftheria, commenter in this blog post.
The other 3 entrances are not available yet. They will be for higher level Nests.
Chaos Opening Guide
Chaos Opening Required 1 ~ 4 Person to enter the dungeon, will not use any ABP / FTG. Once your level reach 32, and your bag got Key Dimensional, then you can enter the Chaos Opening dungeon.
Enter Location: Saint Heaven - Black Mountain Calderock - Gray Ruin
After you done the Chaos Opening dungeon, you can get the ingredient to make the Skill Acce : -
You can make those skill within level 25 ~ level 40, upgrade the skill + 1, means ur skill will be one more level higher than the level u holding now. You can either make in Ring, Earring or Necklace, and can be used for weapon prefix ingredient also.
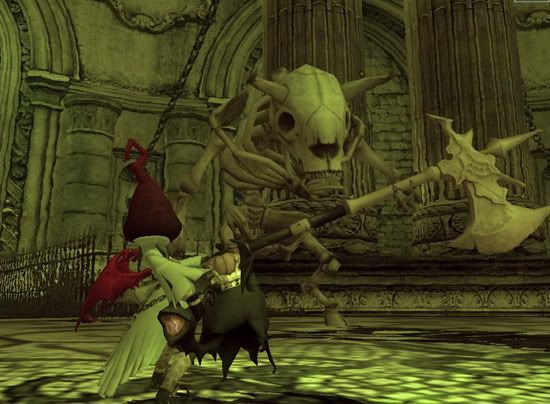
Chaos Opening dungeon enter mode, is random. Means that they will randomly give u some map and ask u to clear the task, but Boss stage will be the same, you will be go into a dimension space and fight with other classes shadow.
Random Map - Dun think i will scare u even u got a big axe!
Zombie Map
Random Map : Whole bunch of ogre
Boss Stage - Fight with other classes shadow and win the battle!
Hidden Guide:
1. Key Dimension seem to be tradeable now.
2. The skill Acce will be according to your level, means if your level is 32, then the skill acce things appear in the blacksmith is around level 30+, if you are level 40, then ur skill acce available in blacksmith is around level 40.
Purgatory Cerberus Set must be the best suit in Dragon Nest so far. Cerberus set can be made by the item dropped in the Cerberus Nest dungeon.
▲ the best set of Dragon Nest item,
Cleric
Cleric
Set Bonus
2 set
Max HP +273
3 set
Max MP +255
4 set
Final Damage 21
5 set
Max HP +410
6 set
Max MP +382
7 set
Strength 12, Intelligence 9, Health 5
Final Damage 42
Sorceress
Sorceress
Set Bonus
2 set
Max HP +248
3 set
Max MP +232
4 set
Final damage 19
5 set
Max HP +372
6 set
Max MP +348
7 set
Intelligence 11, Health 9
Final Damage 39
Warrior
Warrior
Set Bonus
2 set
Max HP +248
3 set
Max MP +232
4 set
Final damage 19
5 set
Max HP +372
6 set
Max MP +348
7 set
Power 15 and Healthy 9
Final Damage 39
Archer
Archer
Set Bonus
2 set
Max HP +248
3 set
Max MP +232
4 set
Final damage 19
5 set
Max HP +372
6 set
Max MP +348
7 set
Agility 15, Health 9
Final damage 39
All the items in Dragon Nest have the prefix. To strengthen the item, some unique abilities corresponding to the prefix will be added to the item. Cerberus set has a specific prefix 'Purgatory'.
Let's see what kinds of abilities will be added to 'Purgatory' Cerberus set:
1. Hidden Stage: Chaos Crevice Location: Gray ruins and Foothills of Black Mountain Number of players: 1 to 4 Entry ticket: Dimensional Key (the same one that you use for Abyss Rabbit). Count: 14 times per week.
*The drop rate of dimensional key in normal dungeon has been increased.
- experience will not be reward for killing monster there.
- experience will be given for clearing the stage.
- can obtain various crafting materials.
- can obtain special A ranked ring crafting materials: Shiny Skill Shards.
Location
Entry Ticket
1st Stage: Mimic
2nd Stage: Punisher + Cube
3rd Stage: Doppleganger
2. Skill Ring
Special A-ranked ring can be crafted at blacksmith (just like adding a prefix to current item).
Formula:
Base Ring 50A + x Shiny Skill Shards = Ring with 1 random additional stats (10 type of stats) + 1 skill level opt (specified by the crafter) 10 Random Stats Available:
* Phy att 140~140, Mag Att 84~84, Vit 37
* Phy att 84~84, Mag Att 140~140, Vit 37
* Phy att 129~129, Mag Att 64~64, Light & Dark Att 2.95%
* Phy att 64~64, Mag Att 129~129, Light & Dark Att 2.95%
* Phy att 105~105, Mag Att 70~70, Str & Agi 28, Int 25
* Phy att 70~70, Mag Att 105~105, Str & Agi 28, Int 25
* Phy att & Mag Att 93~93, Faint 270, Delay 337, Critical 405
* Phy att & Mag Att 93~93, Str & Agi 18, Int 16, Vit 15
* Health 47, Faint 405, Delay 506, Critical 1215
* Critical 943, Light & Dark Att 2.95%, Fire & Water Att 2.95%
Available Skill Opt
Bone Crash +1
Finishing Attack +1
Maelstorm Howl +1
Moonblade Dance +1
Ice Barrier +1
Laser Cutter +1
Rolling Lava +1
Gravity Switch +1
Magical Breeze +1
Hurricane Dance +1
Rising Storm +1
Ambush Point +1
Relic of Shock +1
Consecration +1
Hammer of Judgement +1
Justice Crash +1
- The skill ring, after being crafted, can only be used by certain skill (which has the skill of course).
- Crafting might fail.
- Skill necklace and earring will be introduced in subsequent updates.
* Basically this feature allows you to increase your skill level NOT JUST BY SP alone now, but SKILL RING can increase your skill level too.
Energy Reflection Mirror (or in short, mirror) is an extremely useful skills and can be used in various ways. I hope this small guide will help other force user to use mirror in various nest/ dungeons. Functions of Mirror:
1) Damage Booster
The mirror will increase the magical damage dealt to surrounding targets by 20% at lv1, last for 12sec. The AOE of mirror is very large.
*How to know if the mobs / boss are affected by the mirror?
You will notice after you cast the mirror, the target will have some small little shield dropping from the body. So far, nothing in dragon nest is immune to this debuff. You should consider spamming the mirror in a 4 or 8 man party if there are others magical damage user, such as priest, elemental lord and other force users in your party because your party members will deal higher damage and benefit from the debuff too.
*Does the effect stack if i cast more than 1 mirror?
The effect of the mirror cast by the same force user does not stack even if you cast more than one during time acceleration. However, if the effect of the mirror cast by different force users does stack. In other words, if there are two force user casting mirror in the party, the magical damage dealt can be boosted by 40% in total.
2) Boss Blocker
One of the unique ways to use mirror is as a boss blocker. I will list some important examples where mirror can be used as such.
Apocalypse Nest (normal/hellmode): * Electric Ogre Stage: This is the classic usage of mirror. After the HP reaches HPx1, he will start using his hugging/tackling attack, which is an instant KO if you are not a paladin on avatar mode. Near the last bar of his HP, erect a mirror in front / inside the ogre, and see this cute little dude trying to chase after you/your party members but simply couldn't get near.
* Apocalypse Boss Stage: There are two ways to block apocalypse. First, during his spinning attack, if the aggro is on you, teleport away and erect a mirror in front and see apocalypse ramming into your mirror and unable to get close to you. This is a very good chance to cast meteor swarm too. [ mirror last for 12sec, meteor swarm last for 8.5sec ]
Check out the link below to see the videos for force user soloing hell apocalypse with the use of mirror at various bosses.
Sea Dragon Nest * Mutant Cerberus Stage: Block the cerberus with the mirror along with other priest's relic to prevent him from moving around.
Archbishop Nest:
* Revived Punisher Blast Stage: He will invincible at the start of the stage and will be chasing you and your party members. Use the mirror to block his advance, while your party members clears all the mobs in front. (see the video below).
3. Projectile Blocker
This feature can be useful at time to block projectiles or the like from bosses.
Some examples are:
* Manticore (normal/hellmode): Mirror is especially useful in blocking the chasing tornado summoned by manticore in hellmode.
* Electric Ogre in Apocalypse Nest (hellmode mode): The chasing lighting ball can be blocked with the mirror. You don't have to run around like others do.
* Monta in Sea Dragon Nest stage 6: The binding vine which is crawling on the floor can be blocked with the mirror.
* Sea Dragon battle: Ice age of sea dragon (ice bind) can be blocked with mirror. Strictly speaking, this is not even a projectile. It is acts more like a dummy to be frozen on behalf of yourself.
* Darklair: Block the cannons at R19 survival stage.
* Chaos Crevice: Cannon shot by the Tiger at stage 2.
4. Self Blocker
Mirror can be used to block yourself and your party member from falling into the suction hole of stage 2 in sea dragon nest in case you got the poison island.
-I don’t like Charge Shot (it is slow to cast and not really convenient in pvp, although I know I can add crest animation, but as an Artillery I need other skill crests)
-Detonating Arrow is more precise than Ambush Point
-If you like and want to max Guided Arrow. (mag atk is what you need)
-And Extension Arrow Ex is very beautiful, and has huge AOE.
Well, if you really like Bowmaster’s magic attacks, I advise you to be Artillery, her skills are really great to play with, I can see a lot of people who chose to be Sniper, but I’m sure Artillery is not a class to be underestimate, if you know how to play with, you’ll really enjoy and be a great DPS in pve. Her Magic Breeze is a very special skill which can allow you to switch all you phy skills to mag skills, and add +30% mag atk also during 10 seconds. It is a very important skill for all Artillery’s gameplay, indeed usually we all focus to increase our mag atk, and abandon our phy atk, what is not an advantage because I think Bowmaster in general has more phy skills than mag skills.
[~ ~ ~ My Artillery skill build ~ ~ ~] (I'll just justify my choices, the rest is simple to understand)
Archer Skill tree:
-Owl’s Insight: I chose to max it because I thought it could be cool to have 550% critical every minutes. I wanted this skill to be like Eagle Anger (skill in the bottom left hand corner)
-Multi shot:lvl 1 because it has long cooldown, and in pvp I could see that it is not worth to max it, in my own experience we need to be close, sometimes it hits sometimes not, I just want it to delay and combo after.
-Phy/Mag mastery, Mp regen :I maxed it because archers don’t have big defence and we don’t want to run out of mp (cf: Spirit Excellation)
-Aerial Evasion: lvl 1, I think it doesn’t really need to be maxed, because in pvp and in pve we are not gonna fly every 19 sec(max lvl 4)
Twin Shot: I need to sacrifice this skill so I can have Owl’s Insight lvl8.
This is my gameplay, but I think it will be more sensible to have Twin Shot maxed, if you don’t need Owl’s Insight. Or leave Owl’s Insight lvl 1 and max Twin Shot.
Bowmaster Skill tree:
-Extension Arrow:lvl 12, to deal more damages
-Sylph’s Aid:Max it, range is important.
-Crossbow/Longbow Mastery:It is recommended to use a Crossbow, but I think a Longbow can do it to play Artillery. Max it. RANGE ! (In pvp, use a Longbow if the Crossbow is your main weapon, everything is nerfed, so the crossbow is not really worth)
-Guided Arrow:Nothing much to say about it, all good bowmaster know how imba is this skill. Max it.
-Stunning Shot: Good to stun when you can see the enemy defenceless./!\ This skill doesn’t stun every time, especially when enemy is casting a skill.
-Ankle Shot:Imba skill, great damages, Bind for 5.6sec at max lvl.
-Arrow Shower:lvl 1, Good dps skill. Weakness while casting it, because you can’t move until the skill is over.
-Pinpoint Shot:Physical Ulti skill, Available since newest update, I think this ulti is better than the other ulti, faster to cast, and has better superarmor than the other.
(**I like to do:Owls Insight, Magic Breeze, Eagle Anger, Pinpoint Shot = IMBA DAMAGES !!)
-Revolutionary Ballista:Good dps when there are a lot of mobs in front of you. Learn it to unlock Artillery skill tree.
The other skills are not max, or learn cause i dont have enough sp.
Artillery Skill Tree:
-Magic Breeze: lvl 1, explained upper.
-Extension Arrow EX:learn it to add an explosion on impact.
-Detonating Arrow:Good dps skill, average AOE damage, add two damages, first: when it touches the enemy, second: EXPLOSION(is imba ;D)!
I hope it helps you, I don’t regret to have chosen Artillery, this is one of my favourite classes. If you have any precise questions post it below, I’ll answer you. As all classes she has her own weakness and her key points. Don’t judge the book by its cover ;P.
How to access the farm channel?
1) Must have VIP bought from Cash Shop. (To fish & farm. You don't need to be VIP to cook.)
2) Must be level 24 or higher, character in Saint Haven.
Fishing Tools required:
Fishing Rod, Baits (Earthworm). Can be bought from the old man.
Fishes location:
Google Doc link: CLICK (Easier for you to search for a fish in AH.)
Additional Info:
1) Auto-fishing requires 45 seconds, 1 hour = 80 baits. So prepare the corresponding amount depending on how long you're gonna afk-fishing. :P (Thanks to Elegance pointing this out)
2) Manual fishing does not increase success rate, so no point doing that.
3) Fishing level does not give any bonus at the moment, will probably add new feature in the future.
4) Max fishing level is Intermediate 8.
5) You can sell A,B-grade fishes if you don't have space to store them. Not needed in any recipe at the moment.
How to level Farming Mastery fast?
Plant the highest level seed available to you when just started out, NO NEED to water your crops, let them rot. You will get farming experience the moment you plant your seed. Repeat this until you reach Intermediate 1.
How do I get those B-class crops required for B-class foods?
All B-grade crops comes from C-grade seeds. There is a small chance to get B-grade instead of C-grade crops when you harvest.
Where do I find my harvested crops?
Talk to the old man inside the farm area to gain access to your crops storage.
Profitable plants?
1) Certain B-grade crops, will explain later in Cooking.
2) Revive Apple 复活苹果 (5 days to fully ripe. Remember to water everyday!)
3) Life Essence 生命的精髓 (30 minutes per harvest. Used to enchance 40S equips)
4) Nectarine Bud 红色蜜桃 (Plant this and let it rot and your farming level will go up extremely fast)
Additional Info:
1) You can plant more as you level your farming skill, maximum of 5 for now.
2) You can only plant 1 seed in your private farm.
3) Harvested crops will only stay in your crops storage for 15 days. Take them out before expire!
4) You can only plant 1 A-grade seed of the same type at a time.
5) Max farming level is Intermediate 8.
6) You can water your plant exceed the water amount.
How to level Cooking Mastery fast?
Cook B-grade foods at low level (Dire Potion, the one that adds X STR, can be found at 2nd page of each tabs). Cook A-grade foods once you reach Basic 8.
Monta has various deadly skills:
* Poison Spore: From HPx4 to x1. It will cast poison spore at one of the party member who draw aggro. After being hit, the person will have an skull icon on his head and poison aura will appear around him (greenish ring). There will be a system notice about it too. That person should be far from the others and party members should not be in the vicinity of the poison aura around him. That person who catch the poison won't actually receive any damage, however anyone else who are in the aura will get 15K~30K damage per second.
* Poison Gas (AOE Poison): At the end of each HP bar, after a countdown of 3 sec, the whole field will be filled with poison gas. Each hit 10k damage, one will probably be dead after this skill is over. This skill will be casted everytime when each of his HP bar is about to be depleted.
*Vine Grip: From HPx3 to x1. Monta will dig its mounth and spit something out onto the floor. A vine will start chasing a random player. Players who are near the vine will then be entangled with some sort of poison vine (there will be another system notice about it). The bind attack has a certain AOE and can bind more than 1 person.
Deal 1500 damage per second for 10sec. After 10sec, roughly 50k damage will be dealt. Damage penetrates shield block and avatar. If someone is binded, other party members can save them by breaking the superarmor of the vine. Requires high superarmor skills.
* Berserk: After 6minutes of the battle, Monta might go into Berserk mode. There will be a sword symbol on top of this head. It will start dealing almost 50k damage with any single hit. Mercenary disenchanting howl can remove the berserk status. He will only cast berserk once in the whole battle.
* Stomp: From HP x4 to x1. Monta will slam the floor with his fist, with a ring of rock column appearing around it. The first hit deal 4000~5000 damage, while the rock column can deal as high as 20k damage (aftershock damage). The AOE is 360 degree around him. Will not hit melee range or far away from him.
* Charged Stomp: From HPx3 to x1. Monta will raise his arm high and one of his leg as well to power up his stomp. This attack has unlimited AOE and will hit you no matter where you are. A rock column will be forced out underneath your feet to deal heavy aftershock damage. Avoid this attack by timing your jump, just when his arm is at the highest point and about to slam down. JUMP AWAY from your current spot with arrow key so that you will not be hit by the rock column. Avoid jumping to your party members or you will get hit by his rock column.
* Earth Quake + Chase: Hpx1. Monta will jump and stomp to cause earth quake and faint. Deal large AOE damage to the whole screen. Jump to avoid. Monta will chase after member with highest aggro (normally paladin with provoke)
* Dig underground: Hpx2 to x1. He will dig underground and hide after hitting HPx2. His hand will punch out from the ground sometimes.
* Summon Zombie: summon alot of poison zombie to attack you.
Flower Skill:
* Bite
* Spit Poison
* Roar: This is skill is extremely damaging. Make sure someone disable or kill the flower when everyone is gathering on the platform.
Strategy:
Monta is a very tough boss which requires perfect coordination between party members to kill it without sacrificing anyone. A small mistake could wipe out the whole party instantly.
Roles
Main Tank (main-T)
* provoke
* make sure your provoke does not get cancel by the flower beside you.
Sub Tank (sub-T)
*provoke if main-T lose it.
*Save main-T with avatar+smite+armor break etc if main-T is binded. The reason for using avatar is because the main-T might get infected with poison ring when he is binded. You will be killed if you go near him without avatar.
*Distract the flower so that it doesn't disturb the provoke of main-T
Mercenary
* Use disenchating howl at the 6th minute to remove berserk on Monta
* Cast highland, superarmor buff whenever gathering at the platform at the end of each HP bar.
* Use devastating howl to reduce the attack of Monta.
Priest
* Cast miracle hand at the top of the platform (near the sub-T location) when each of Monta's HP bar is almost depleted. (to be safe, around 10~15% of HP bar). Make sure, that there is a poison ring on the main-T (a sign of the aggro is on him) before you cast the miracle hand.
* Heal the party when necessary.
* Cast various relic (the Great Wall of Relic) around Monta to block the vine.
Force User
* Cast time acceleration when all the priests finishing casting their miracle hands.
* Use mirror to block the vine if it manage to slip past it.
* Distract the flower so that it doesn't cancel the skills of the main-T
Vine Breaker
* This is a special role given to 1 to 2 member(s) in the party. Normally a fast moving character with high superamor skills. Mercenary, sword master and force user are good candidate for this task.
* Stay at the back at the relic wall most of the time and reserves high supeararmor break skills.
* Be extremely alert and save party member(s) who get binded ASAP.
Position of Party Members
Party members are not strictly required to stand at the right zone, but that's the place to stand during idling period (not really idle but when your major attack skills/dmg reduction buff is cooldown and you don't really want to attack or waiting for cooldown of miracle hand)
Zone Definition:
High Risk - not blocked by any relics. can be binded anytime and party members might not be able to make it to save you. DO NOT stay there for too long, especially when monta is digging his mouth.
Medium Risk - Only will get binded with all the relics are down or destroyed by monta.
Low Risk - Almost impossible to get binded, because they are shielded by priests and their relics.
If Main-T get bind,
If Priest or Sub-T get bind:
The advantage of such formation is that:
* the Vine Breaker (DPS/Merc) can actually see what monta is doing while trying to save the sub-T or priest. DPS/Merc will have the chance to dodge some of the attack while saving instead of sustaining damage while saving.
* The fan-shaped area allows the DPS/Merc to be spaced out to avoid the the raise-leg stomp and at the same time, be protected from Vine grip.
How to attack: DPS can go to the side of the monta to deal damage, but try to stay behind the relics to avoid getting bind.
Flow of the Battle
At the start of the battle, a paladin with high level provoke run up to the 2 o'clock platform (top right corner) and provoke the boss. The platform is chosen because it is the widest platform among the 4 of them. Monta can't jump up to the platform. All other members do nothing and wait for 6min to pass.
Mercenary get ready to cast disenchanting howl at 6minutes to clear his berserk status. Sub-T get into the position at the other end of the same platform. After it is done, all party members can start attacking monta from its back while the main-T provoke it.
At the end of HP x4, wait for a Poison Ring to be cast on the Main-T. This is to prevent the Poison Ring to be casted on a random party members while we are gathering at the top of the platform to avoid the AOE poison gas.
Once the Main-T is infected with a poison ring, priest 1 cast a Miracle Hand on the top the platform at the position of the Sub-T. This miracle hand can reduce the damage from various stomp and save the party member in case Vine Grip is cast suddenly.
After miracle hand is up, all other party members move up to the platform (where the sub-T is) and gather in the Miracle Hand. Continue to deal damage to Monta until the AOE Poison Gas is triggered. Priest 2 continue to cast the second miracle hand after the first one finish.
After the AOE Poison Gas is over, all party members go down from the platform and go into the formation suggested above. Priests cast the Great of Relic around Monta and DPS can start damaging Monta. The 3rd miracle hand can be used if available. Time acceleration should be cast right after the final miracle hand. Devastating howl can also be used to cut the attack Monta after the last miracle hand is cast. Vine Breaker and Sub-T must be extremely alert at all times.
After hitting the end of HPx3, make sure miracle hand is CD and a poison ring is cast on the Main-T. Repeat the same process again, as with the end of HPx4.
After this second poison gas, Monta will start tunneling into the ground and summon zombies. Clear the zombies ASAP. When Monta reappear, DO NOT attack before the main-T provoke Monta and lure it to the platform. Once Monta is back into position, everyone else should get into the same formation again. Note that he likes to tunnel a few times during Hpx2.
Repeat the same thing when his Hpx2 is about to get depleted. Wait for a poison ring, miracle hand, gather, deal damage. This 3rd poison gas attack is the last one you will see.
Finish the last HP bar in the same formation and you will see the dragon soon.
The chest that appears at this stage normally gives 40A weapons.
Upon going into this stage, Serpenta will cast dragon breath attack, which is almost one hit ko for most players. Quickly hide at the corner (see Video) to avoid the breath.
Phase 1 skill:
* Claw: Melee ranged
* Middle Bite (Peck): Long ranged. Serpenta won't be able to hit you with this attack if you are hiding at the corner or stay by the side.
* Dragon Breath: Will cast every 60sec once. Must avoid by hiding at the two corners. It has some sort of suction effect, so arrow key has to be hold down to avoid getting sucks in.
Dragon Breath is a special attack that can remove any buff on the target. So nothing can save your from it (shield block, avatar, miracle etc). However, a special cooking item will make you immune to breath attack for a short duration.
HP x19
* Side Pecking: Serpenta will be able reach the corner at this phase. DPS char should see the motion of his head. Avoid swiftly if he is pecking into your direction.
* Ice Claw: higher damage, slow effect.
After the HP is brought down by 85% for this hp bar, Serpenta will fly to the next map.
Before going into the second map, cast a highland on everyone. Miracle hand should be ready.
=============================
Second Map: Phase 2 - Cannon Phase
Cannon View
Rear View
HP x 18.15
Before entering this map, cast highland and buff up.
Upon reaching the 2nd map, move to one of the edge of the map and overlap each other. Miracle hand should be cast immediately after that.
The reason for overlapping is because ice flake will be cast on party member which has a eye icon. The ice flake will not hit the person with the eye icon and the person overlapping with him. However, ice flake will deal heavy damage to people around it.
The reason for casting miracle hand is to reduce the damage from spike thrown by serpenta. After his first dive breath, the 3 cannon holder can move to their respective cannons.
Serpenta will be flying around in the sky during this phase. He can only be damaged by Cannons. Paladin can try to reflect the damage of spikes also.
There are 5 cannons lying in line. It is advised that only the first, third and fifth cannons are used. leaving a gap of empty cannon between each cannons. The reason for doing so is to avoid the ice flakes (see below).
Boss Skills
* Ice Flakes (Eye): Serpenta will mark afew player in the party. Dark eyes symbols will appear on those who are being marked. Serpenta will shoot ice flakes at those who are being marked. However, it won't damage the one being marked but only members around him, 50k ~ 70k damage, AOE, slow effect. Everyone should stand apart from those who are marked. Another method is stand exactly with the one being marked, overlapping each other.
* Monster-throwing attack (Spike): Serpenta will throw monster from the sky to deal damage. Serpenta will never aim the person handling the cannon. To avoid getting hit by spikes, simply move from your current location when you see the black smoke on the dragon and spikes are thrown from him. Paladin should also provoke the monster so that they won't attack the person handling the cannons.
* Ice meteor (Cube): Serpenta summon 5 ice meteors on the sky. They will grow and move towads the whole team slowly and explode. Damage is around 90k+, and extremely large AOE. The meteors can be destroyed with cannons (5-6 normal shot, 1 charged shot). In the unlikely event that the ice meteor can't be destroyed, it is recommended that all members run to the safe zone (see picture) to avoid the damage from ice meteor.
Normally the party member who are not holding any cannons will be split into 2-3 subgroups, each at the side of the map. Move according to the skill cast: eye - overlap, spike - move around.
After the dragon is brought down to near HPx16 (roughly 25%), the person handling the middle cannon should run and gather at the sides with the other party members.
The other party members should be informed (they will not see the dragon's HP since they never hit it with cannon). Miracle hand should be cast and all party members overlap each other near the sides of the map.
The other 2 members at the 1st and 5th cannon should observe the dragon's HP and its profile picture beside his HP carefully. Note that it normally glows red if the cannon hit the dragon. However, when the dragon's profile picture STOP GLOWING RED even if the cannon hit it, press ESC to release yourself from the cannon and dash to the sides of the map ASAP. The Dragon will dive down with a breath attack very shortly afterwards.
NOTE #1: The dragon might not dive immediately at 16.25x HP. He might cast an additional wave of ice meteor which can prove dangerous if not dealt with. To prevent this, it is better to wait for additional rounds of ice meteor at 16.4x HP. After clearing this round of ice meteor, the 3rd cannoner can go to the side and overlap with others. The 1st and 5th cannoner will then continue hitting the dragon till the dragon dive down.
NOTE #2 : after it stop glowing red, DO NOT run back to the cannon NO MATTER what happen.
=============================
Phase 3
Main-T stand near the edge of the map where the cannons previously were and start provoking the dragon. Sub-T stand beside him, roughly one cannon distance away. The other 6 party members should be divided into 2 sub-groups each at one side of the dragon.
Main-T & Provoke
Main T must keep the aggro on the dragon at all times and make sure the dragon is facing you. Provoke need to be level 7 at least with A/B duration plate.
The timing for provoke is an art. It should not be spam whenever it is cooldown because the dragon is "immune" to provoke at several occasion.
Most main-T will stay near the edge of the map to prevent Blackhole from being cast. While at the edge of the map, provoke should only be cast is when the dragon is
* not doing anything
* pecking sub-T or main-T
* claw attack (with no ice)
* doing tailswipe.
* turning around when aggro on you is lost.
* casting rotating dragon breath ( you will need to walk nearer to him)
Provoke should not be cast when the dragon is:
* casting ice claw
* casting blackhole
* flying and doing any airborne skills
* casting ice age (bind)
* casting rotating dragon breath (when you are at the edge of the map)
Note: rotating dragon breath can only be provoked if you walk nearer to him. Staying at the edge of the map while casting provoke during this skills is useless.
The two subgroups should gather at the tail of the dragon and deal damage under miracle hand. HP x 16.25
* Bite: Serpenta will be using this throughout the whole battle. Normally only aimed at the paladins.
* Ice Claw: homing effect, can be blocked with mirror. Will be cast throughout the whole battle.
Paladin has to take note that the ice claw will cause lost aggro. Main-T or Sub-T has to refresh the aggro with provoke right after the ice claw attack. The key role of the two paladins is to make sure the dragon doesn't turn his head towards the other party members.
HP x 15.25
* Dive Breath (Dive): Serpenta will flap his wings and fly to the sky. Shortly after that, he will dive down with a breath attack. Take note of which way his head is facing. Members from the two subgroups hide at the two map edges at their respective edges (to the left or right of dragon) of the map to avoid it. Main-T and Sub-T should run to the side too.
HP x14.25
* Rotating dragon breath: First cast at 14.25 x HP. Angle of rotation is roughly 180~270 degree, can be clockwise or counterclockwise. The screen will go blur for awhile while Serpenta flaps his wing. The blur effect induce a slow status on all party members. The breath attack that follows clear all buffs and deal very high damage.
Mercenary and Paladin roles are very important here. Mercenary:
* Approach the dragon (near tail or hind legs) with superarmor buff when the dragon's HP is near 14.25
* Once the screen goes bluff, cast Relieve immediately which clears the slow effect.
* Cast Devastating howl before the dragon flies up and start his breath attack.
* If you miss (no HP reduction observed),inform the paladin immediately and the paladin will hav to eat dragon breath potion to withstand the damage.
Paladin:
* Cast elemental aura to reduce ice/water damage from the rotating breath (permanent aura effect cannot be removed by the breath). Although mercenary induce at 80% attack reduction on the dragon, the damage is still extremely high. Roughly 50k damage will be induced on the paladin under the combination of devastating howl + elemental aura.
* Stay at your current location. Do not run to your other party members. If you manage to provoke before the casting of rotating breath, the dragon will not rotate at all. This is important because you certainly don't want your other party members' buffs, especially buff potion, to be cleared by the breath attack.
* If devastating howl debuff is not applied to the dragon for some reason, eat dragon breath potion to be immune to the breath for 10sec.
After the first rotating dragon breath at 14.25xHP, the next rotating dragon breath will be casted after every 90second.
There are two types of Rotating Dragon Breath:
(i) HP-triggered
* cast at 14.25, 9.25, 7.25 and 5.25 x HP.
(ii) Time-triggered
* cast every 90sec after the first HP-triggered breath at 14.25. Will stop after hitting HPx10.5.
Mercenaries have to make sure that their essential skills: superarmor buff, relief, and devastating howl are ready before the rotating dragon breath.
HPx 13.25
* Ice Age (Bind): Serpenta will raise his head and flap his wings, freezing players. Player will die shortly afterwards. ~110k damage. Normally the person with the highest aggro will be frozen. From now onwards, Ice Age will be cast thoughout the whole battle except 9.25~7.25x HP.
Typically, that person is the main-T. If the main-T was frozen, the sub-T need to save him RIGHT AWAY with Smite. The main-T can prevent himself from being frozen by casting avatar or place summoned units (claw, hound or mushroom) in front of himself and take steps backwards. The frozen attack has a certain AOE and if the main-T is too close to the summoned units, he will be frozen as well. If the sub-T is a priest instead of paladin, relic should be cast in front of the main-T to act as sacrificial target.
However, if the pally lose aggro and some other members are frozen, the other members in his sub-group should save him. Use high superarmor break skills (miracle hand if need to) to break the ice. Try not to stand too near each other when ice age is cast so that the whole sub-group will not be frozen all together.
Certain classes can summon sacrificial target to be frozen by ice age and thus preventing himself from being frozen. It is important to make sure that you, your sacrificial target and the head of the dragon are perfectly in-line and you are not too close to your sacrifice target.
- Priest: all relics
- Academic : all summons
- Force user: mirror
* Black hole & Tail Coil: CD ~30sec. He will spit some dark matter which will suck whoever nearby to its centre. Serpenta will then turn around his body and use hits tail to coil around anyone at the centre of the dark matter, suffocating him. Extremely high damage. If you ever get sucked into the blackhole, spam jump and tumble/blink to have a slight chance to getting out. He will stop casting this after HPx7.25
=============================
Phase 4
HP x 9.25
When the dragon flies, there are two possibilities: ice rain( purple bomb) or dive with breath attack.
* Ice Rain (Bomb): cleric just cast shield block. non-cleric have to keep running to avoid being damaged. Ice rain will be casted from 9.25x to 4.25x HP. It is important to note that relics and summon units attract rain also. When running, DO NOT run towards relic and summon units or any of your party members.
NOTE: Ice Age will NOT appear from 9.25x to 7.25x HP.
Feint-Phase
7.25X TO 4.25X HP
* Ice Flakes: A few members will be marked with eyes. 4 waves of ice flakes will be thrown down on some marked members. A small area within the ice flakes will be the safe zone.
Sub-group members have to stand overlapped with the marked person at the side to avoid being damage. Has a small suction effect. Do not re-adjust your position with arrow key.
Each of the 3 subgroups has to decide on a fixed location to run to and gather for overlapping. The locations are normally marked by geographical features for easy reference ( rock, hole etc) When the dragon flies, move to the spot immediately when eyes are spotted on party members.
It is advised that the view should not be panned away from the dragon. The reason is, the dragon might cast ice rain when it flies, which requires you to run away from others, insteading of gathering.
* Frontal Breath: Follows immediately after the 4th wave of ice flake. The two subgroups at the side move further towards the back of the dragon slightly to avoid this breath. The tanker subgroup move the edge of the map (in the direction the dragon is facing).
* Dive Breath: Follows immediately after the frontal breath. Hide at the edges as usual.
The 3-combo: Ice flake > frontal breath > dive will always be cast together. The 3 combo will be cast from 7.25x to death.
* Side Breath: This breath is extremely dangerous. He will cast this when he is on the ground, almost randomly. The breath spans from the front leg to the end of the tail. Therefore, it's very important NOT to stand any where near his sides after HPx6.25. The safe place to gather and deal damage is at the TIP of the tail.
It is advised that, each ground, either miracle hand or devastating howl should be cast at the gathering point at the tail tip. When moving towards the tail tip, beware not to get too close to the side of the dragon. Try to move along the edge of the map, to be safe.
This is the most challenging phase of the whole dragon battle because the dragon will try to trick you with some false signals.
Normally, eye is followed by ice flakes. The default action after seeing eye on party members , is to overlapped with your party members. However, after HPx6.25, after putting eye icon, he MIGHT start to cast ice rain instead of ice flake. If you stay overlap and not moving, you will be wiped out very soon.
The key to solve this is to differentiate the casting animation between ice rain and ice flakes. Observe what he do after he flies.
See this video to check out the casting animation :
Video above - first part: Direct Rain
- He flied up and open his arm wide directly (with NO dark smoke at his claw). Rain will drop right away.
Video above - Second part: Eye (Fake) + Rain
- He flied up and note that his arm is in front of him. At this moment, the "eye" icon will appear on a few party members.
- However, this is a fake eye when his arm OPEN WIDE (with NO dark smoke at his claw). .He will cast rain instead of the normal flakes.
ADVANCED TECHNIQUE:
* sometimes you probably don't have time to check the sky for his casting animation after he flies up , since you might be moving toward the overlapping point.
* listen to the video above, and memorize the sound the dragon made when he is casting the ice rain.
* once you can do that, you don't even need to check the sky to know that ice rain is coming. Very powerful technique once you have mastered it.
* What you need to do in both cases above, is to cast your shield block if you have (should save for it) Or, if you don't have shield block, then just keep moving.... It 's abit like manticore flying bombing where he won't hit you if you keep moving.
However, do not run into the other party members or tragedy will happen =.= Assign 3 paths for each members from each sub-group to run so that you guys won't run into each other.
For flakes, his attack animation are described as follows:
Eye (Real) + Ice Flakes:
- After placing eye, if you see that his mouth breath dark/icy breath with dark smoke on both claws. After a roar, it will throw flakes.
* You should quickly move to the assigned overlap spot.
=============================
Phase 5 - "Pig-Head Mode"
HP x 4.25
At this last phase, when Serpenta is airborne, it will DEFINITELY cast the 3 combo. So simply move the overlap spot without even looking at him.
He will still cast the usual ice claw, ice age, side breath and bite when he is on the ground. However, black hole will not appear again.
Make no silly mistake and be patient, and the dragon is yours!
There will be 4 final chests after you defeat the dragon.
The usual drops are a few parts of sea dragon gears, S-rank potential codes and S-rank skill plates, with a lot of gold and intermediate gems.